GCam Port | Google Camera APK v9.2 (April 2024) › Forums › Forum for Common Topics (Generic Topics for all Devices) › Android Rooting › How to Root Android Using Magisk
- This topic is empty.
-
AuthorPosts
-
March 26, 2020 at 4:55 PM #109578SibaKeymaster
Rooting on Android is a process of gaining read/write access to the system which is otherwise restricted. One must unlock bootloader and install a rooting script such as Magisk zip or a SuperSU zip file using a custom recovery like TWRP, to gain ROOT access on an Android phone.
In this post I am going to present a very easy to use step-by-step guide on how to root an Android phone by installing Magisk zip package, with basic explanations.

Well, before going into the details I would like to bring other Magisk features and some history in the development of Magisk which is presented in the next section.
What is Magisk?
Magisk stands for “Magic Mask”. Basically, Magisk is a suite of open source tools for customizing Android which supports devices running higher than Android 4.2. It covers fundamental parts of Android customization: rooting, boot scripts, SELinux patches, AVB2.0 / dm-verity / forceencrypt removals etc.
Magisk has three fundamental tasks listed as below:
- MagiskSU: that provides root access.
- Magisk Modules: Modify read-only partitions by installing modules
- MagiskHide: Hide Magisk from root detections / system integrity checks
In this post, I am going to cover the MagiskSU part that enables ROOT access on an Android phone. Once you are done with the basics of Magisk, let’s prepare and install Magisk to ROOT your Android phone.
[su_note note_color=”#F9D9D9″ text_color=”#AA4343″ radius=”3″ class=”” id=””]Magisk is installed in the core of Android which requires an unlocked bootloader on a phone, which may void the warranty and delete all data on your phone. Make sure you take precautionary measures before you follow this guide.
I won’t be responsible for any damage to your phone.[/su_note]
Understanding How Magisk is Installed
Magisk can be installed from the Magisk installer zip file using a TWRP recovery or it can be installed by patching either a boot image or a recovery image. In this section I am explaining how Magisk is installed on different types of devices.
It is important to understand how Magisk is installed based on the way Android deals with underlying boot process and partitioning.
A/B partitions (or A-only) and SAR or System As Root are the two primary things that needs to be understood before installing Magisk.[su_note note_color=”#FBF4DD” text_color=”#A38C68″ radius=”3″ class=”” id=””]Understanding this thing will basically help you avoid making any mistakes while installing Magisk or to recover if you have done one. I would strongly recommend to read this section before you install Magisk on your phone.[/su_note]
How Magisk works with A/B partitions?
Android phones with A/B partition does not have a recovery partition. So, the Magisk is installed on the ramdisk in the boot partition. If you have a phone with A/B partition system the Magisk is installed on the boot partition.
If you have a device with A/B partitions then you can use boot image patching to install Magisk.How to verify if you have a A/B partition device? execute the below command to know:
getprop ro.build.ab_update
If the result is true, then your device is using A/B partitions.
For example Google Pixel, OnePlus 6 uses A/B partition and Poco F1 and many other phones use A-only partition.[su_note note_color=”#F9D9D9″ text_color=”#AA4343″ radius=”3″ class=”” id=””]But there is an exception.
Despite having A/B partitions on Samsung or Huawei phones, Magisk cannot be installed on the boot partition as it does not have a ramdisk. Instead Magisk is installed in the recovery partition. A separate post will follow on how to install Magisk on Samsung phone, or on Huawei phone later sometime.[/su_note]How Magisk Deals with SAR (System As Root)?
SAR is not of much importance for a user’s point of view but the A/B or A-only partitioning that is associated with SAR is. SAR was made mandatory for devices launching with Android Pie.
On Android Pie SAR, the boot partition of an A-only device no longer contained the ramdisk, hence the Magisk had to be installed on recovery partition.Similarly, on Android 10, all devices must have SAR but devices launching with Android 10 will have a 2 stage init, which is different than that is seen on Android Pie. At the time of Android 10 update, this 2 stage init was not easy to implement as noted by John Wu, the developer of Magisk but as of now it fully supports the same.
The current state of Magisk: it supports non-SAR (good old initramfs), LSAR (both A/B and A-only), and 2SI for A/B (currently Pixel 3 is the only one using this AFAIC). 2SI for A-only will come with the next release.
P.S. 2SI is a NIGHTMARE to work with, so yeah….
— John Wu (@topjohnwu) September 18, 2019
It is important to know if your phone has SAR support or not, based on which you have to install a TWRP if you are going to flash the Magisk installer zip file. execute the below command to know SAR support:
getprop ro.build.system_root_image
Once done with the basics, you can follow one of the below guide to install Magisk on your Android phone.
[su_note note_color=”#D8F1C6″ text_color=”#769958″ radius=”3″ class=”” id=””]
Required Downloads for Magisk Rooting Process
You will need one or all of the below mentioned downloads or guides to root your Android phone with Magisk. Make sure you download the same.
- Magisk Installer zip file
- TWRP recovery for your specific device
- The phone must have an Unlocked bootloader
[/su_note]
How to Install Magisk to Root Android?
[su_note note_color=”#F9D9D9″ text_color=”#AA4343″ radius=”3″ class=”” id=””]Before going to flash Magisk, you need to understand the risks involved in rooting an Android phone. You can always refer to this Magisk troubleshooting guide to find a fix for your problem.[/su_note]
Basically, magisk can be installed on an Android phone in one of the following ways mentioned:
- By installing the Magisk installer zip file using a TWRP recovery
- By patching a boot image with Magisk and installing it on boot partition (for A/B devices except Samsung and Huawei)
- or by patching a recovery image with Magisk and installing it on recovery partition (for Samsung and Huawei running on Android 9 or later)
Out of the above, I am going to cover the recovery and boot image patching method which is applicable for most of the Android phones.
How to Install Magisk Installer using TWRP?
[su_note note_color=”#D7E3F4″ text_color=”#728095″ radius=”3″ class=”” id=””]This guide is only applicable if you have a working TWRP recovery available for your phone. If not, you can follow the below guide.[/su_note]
- Download the Magisk Installer zip file on your phone
- Reboot the phone into a custom recovery such as TWRP
- If you have any PIN lock set on the phone then enter the same PIN on the TWRP (if it is asked) to decrypt the phone’s internal storage
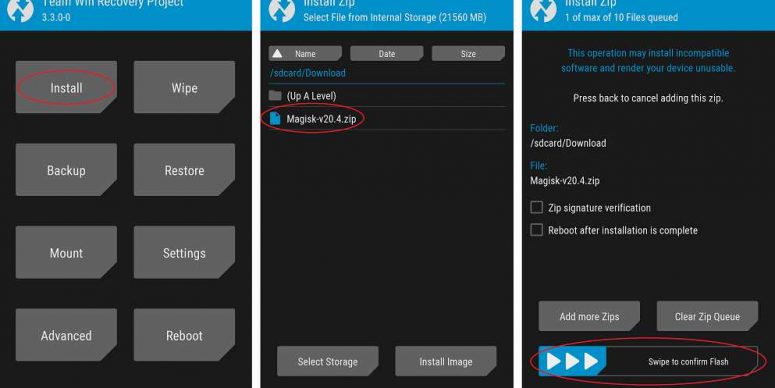
- Click Install > Select the Magisk Installer zip file > Swipe to confirm flash
- Once done reboot to system and you are done.
As a part of Magisk installation the Magisk Manager app should have been installed. If not installed for some reason, you can manually install the Magisk Manager APK manually.
How to Install Magisk patched boot image?
[su_note note_color=”#D7E3F4″ text_color=”#728095″ radius=”3″ class=”” id=””]This method is ideal if your phone does not have a working TWRP recovery.[/su_note]
If you are on a stock firmware then you can extract the boot.img from the actual firmware package or you can ask someone here or on XDA or on internet to provide the same. Once you have the boot image, you can follow the below guide.
- Copy the boot image to your phone
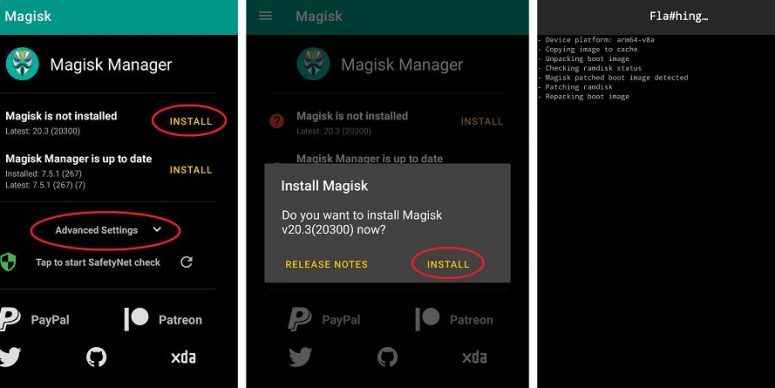
- Download and install the latest Magisk Manager APK on your phone
- Click on Install > Install > Select and Patch a File and select your stock boot image file that you copied in your phone in the earlier step
- Magisk Manager will patch the image, and store it in phone’s internal storage in the following directory /Download/magisk_patched.img
- Copy the patched image from your device to your PC.
[su_note note_color=”#D7E3F4″ text_color=”#728095″ radius=”3″ class=”” id=””]You can manually copy or you can pull the file with ADB using the following command:
adb pull /sdcard/Download/magisk_patched.img
[/su_note] - Flash the patched boot image to your device and reboot.
[su_note note_color=”#D7E3F4″ text_color=”#728095″ radius=”3″ class=”” id=””]You can flash it using fastboot:
fastboot flash boot /path/to/magisk_patched.img
[/su_note]
Once installed Magisk you can see Magisk is up to date with a green tick icon on left. Also, if you want to uninstall magisk you can see the Uninstall button bellow.
That’s all on how to root Android using Magisk. Leave a comment if you face any problem after installing Magisk or unable to install at all.
-
AuthorPosts
- You must be logged in to reply to this topic.