
How to Install TWRP Recovery on Android Using Fastboot
Description
TWRP Recovery is a custom recovery for Android devices. It is commonly used to install custom ROMs, flash ZIP files, take backups, wipe partitions, and recover from some software problems that the stock Android recovery cannot handle.
This guide explains how to install TWRP Recovery on an Android phone using Fastboot. It is written for beginners, but you still need to be careful. TWRP is device-specific, and the wrong recovery image or wrong Fastboot command can cause a bootloop or brick the device.
Warning: Installing TWRP may require bootloader unlocking, which can wipe all data on the phone. Flashing the wrong image can brick the device. It may also void warranty, break OTA updates, and affect banking or DRM apps. Continue only if you have the correct TWRP file for your exact device model and codename.
Who Should Use This Guide?
Use this guide if:
- Your Android device supports Fastboot.
- The bootloader is unlocked or can be unlocked.
- You have a TWRP image for your exact device.
- The device-specific TWRP instructions mention Fastboot.
- You understand that flashing can wipe data or break the device.
Do not use this guide if your device-specific instructions use a different flashing method.
Important Note for Samsung Galaxy Users
Most Samsung Galaxy phones do not use standard Fastboot flashing for recovery installation. Samsung devices usually use Download Mode and Odin-style flashing.
If you are using a Samsung phone, start with the Samsung TWRP recovery downloads page instead.
Do not run Fastboot commands on a Samsung device unless a trusted device-specific TWRP guide clearly tells you to use Fastboot.
What Is TWRP Recovery?
TWRP stands for Team Win Recovery Project. It is a touch-based custom recovery for Android devices.
With TWRP, advanced users can:
- Install custom ROMs
- Flash ZIP packages
- Install GApps, Magisk, kernels, or mods when supported
- Take and restore backups
- Wipe selected partitions
- Use ADB from recovery
- Access MTP and file manager features in recovery
TWRP is available for many Android devices, but not every Android phone has a working TWRP build. Even when TWRP is available, the installation method can differ by device.
Before You Download TWRP
Before downloading or flashing anything, confirm these details:
- Device marketing name
- Exact model number
- Device codename
- Android version or firmware base
- Whether the device uses A-only or A/B partitions
- Whether the device has a separate recovery partition
- Whether the TWRP maintainer says to flash recovery, boot TWRP temporarily, flash boot, or install from inside TWRP
Recommended: Check the device codename before downloading TWRP. A similar phone name is not enough because recovery images are device-specific.
Where to Download TWRP for Your Device
Before installing TWRP, you need the correct recovery image for your exact device model and codename.
Start here:
TWRP download hub for Android phones
That page links to OEM-specific TWRP download lists and helps you find the right recovery page for your manufacturer.
For example:
Do not treat these manufacturer pages as installation instructions by themselves. After downloading the correct file, return to this guide and follow the Fastboot method only if your device-specific TWRP source says Fastboot is the correct install method.
You can also check the official TWRP device page for your exact device. If your device is not officially supported, use only a trusted maintainer source such as the device’s XDA thread or the ROM maintainer’s instructions.
Do not download random TWRP images from file-sharing sites. A recovery image must match your exact device.
Requirements
You need the following before installing TWRP using Fastboot:
- Unlocked bootloader
- A Windows, Linux, or macOS computer
- Official Android SDK Platform-Tools
- USB driver for your device, especially on Windows
- Good USB cable
- Correct TWRP
.imgfile for your exact device - TWRP installer
.zip, only if your device guide requires it - At least 60% battery charge
- Backup of important data
Step 1: Install ADB and Fastboot
Install the official Android SDK Platform-Tools on your computer. Platform-Tools includes both adb and fastboot.
After downloading and extracting Platform-Tools, open a command window or terminal inside the platform-tools folder.
On Windows, open the platform-tools folder, click the address bar, type:
cmdand press Enter.
On Linux or macOS, open Terminal and move into the Platform-Tools folder.
Step 2: Enable Developer Options and USB Debugging
- Open Settings.
- Go to About phone.
- Tap Build number seven times.
- Go back to Settings.
- Open Developer options.
- Enable USB debugging.
- Enable OEM unlocking only if you are preparing to unlock the bootloader and understand that it may wipe data.
Step 3: Connect the Phone to the Computer
Connect your Android device to the computer using a USB cable.
Run:
adb devicesIf the phone asks for USB debugging permission, tap Allow.
Run the command again:
adb devicesYou should see a device serial number.
If the device shows as unauthorized, check the phone screen and approve USB debugging. If nothing appears, try another cable, another USB port, or reinstall the USB driver.
Step 4: Check Whether the Device Uses A/B Partitions
Many newer Android devices use A/B partitions and may not have a separate recovery partition. This matters because the old fastboot flash recovery twrp.img command does not work on every device.
Run:
adb shell getprop ro.build.ab_updateIf the output is:
trueyour device likely uses A/B partitions.
If the output is blank, your device may be A-only.
This check is only a clue. Always follow the instructions for your exact device.
Step 5: Move the TWRP Image to Platform-Tools
Move the downloaded TWRP .img file into the platform-tools folder.
For easier commands, rename it to:
twrp.imgThis avoids mistakes with long file names.
For example, instead of typing:
twrp-3.x.x-x-devicecodename.imgyou can type:
twrp.imgStep 6: Reboot to Bootloader / Fastboot Mode
Run:
adb reboot bootloaderThe phone should reboot into Bootloader or Fastboot mode.
Now check whether Fastboot can detect the device:
fastboot devicesIf you see a device serial number, Fastboot is working.
If nothing appears, fix the Fastboot connection before continuing. Do not flash anything until fastboot devices works.
Step 7: Choose the Correct TWRP Fastboot Command
This is the most important step.
Do not choose a command because another phone used it. Choose the command from the TWRP page or maintainer guide for your exact device codename.
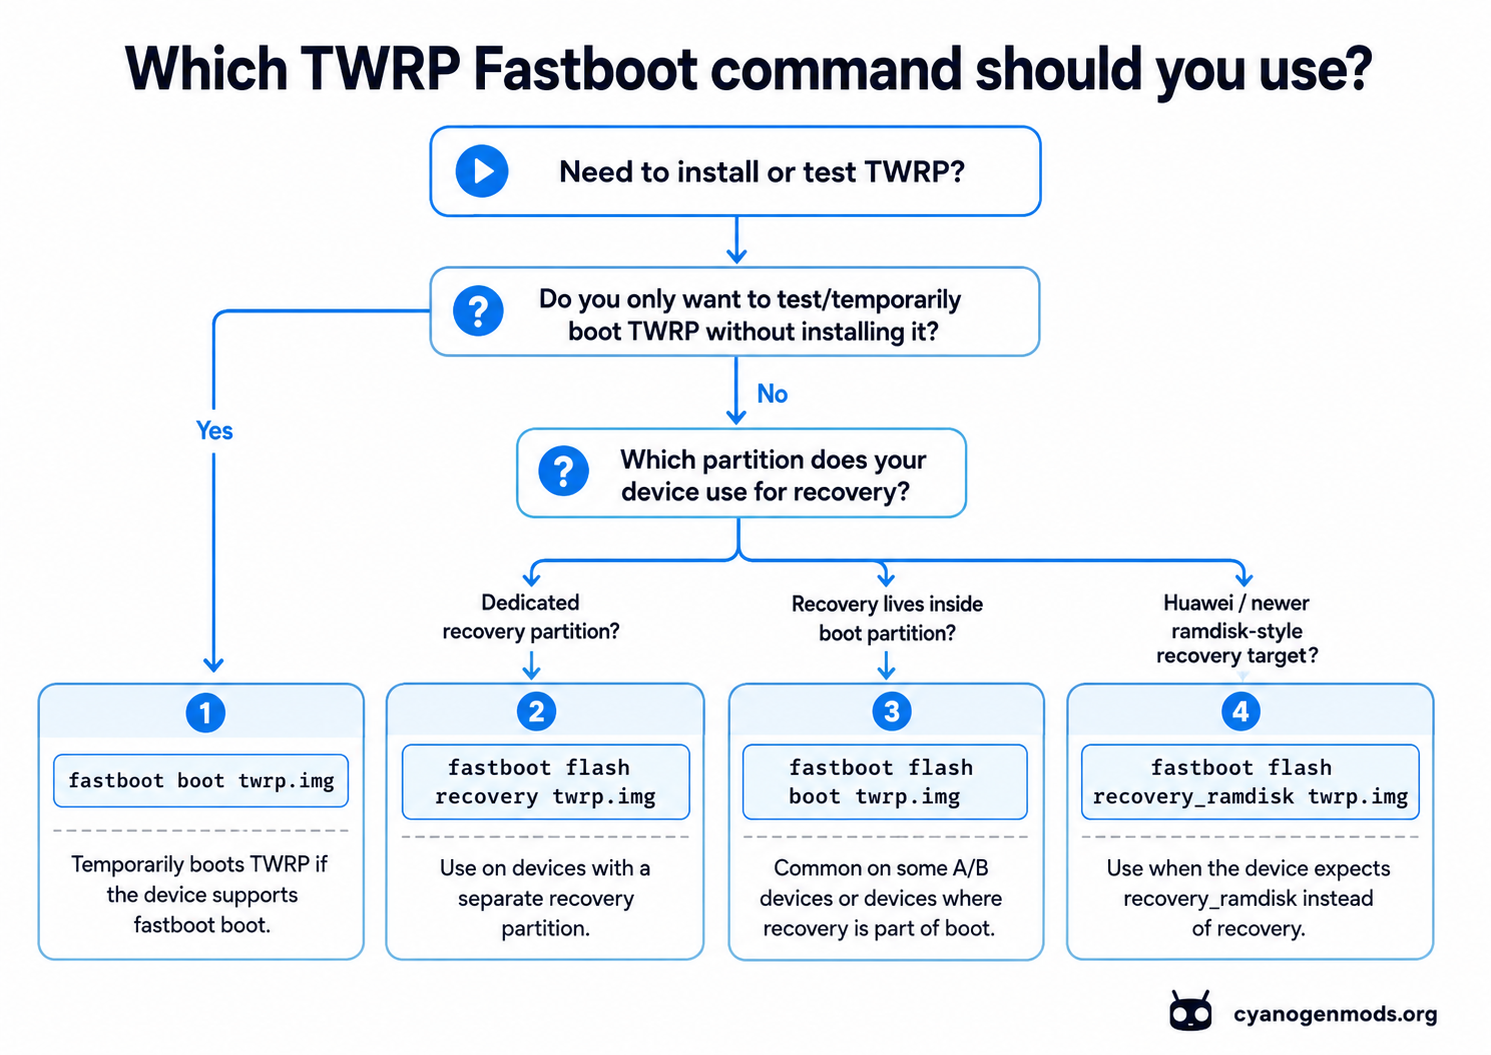
| Device situation | Command path | Use only when |
|---|---|---|
| Device has a dedicated recovery partition | fastboot flash recovery twrp.img | The device-specific guide says to flash recovery |
| Newer A/B device without a recovery partition | fastboot boot twrp.img | The guide says to temporarily boot TWRP first |
| Recovery is inside the boot image | fastboot flash boot twrp.img | The guide specifically says to flash boot |
| Huawei/Honor recovery ramdisk device | fastboot flash recovery_ramdisk twrp.img | The guide specifically says to use recovery ramdisk |
| Samsung Galaxy device | Do not use this generic Fastboot guide | Use Samsung/Odin-specific instructions instead |
What Is the Difference Between fastboot boot and fastboot flash?
fastboot boot twrp.img temporarily boots TWRP without permanently writing it to the phone. This is often safer for many newer devices because you can confirm that TWRP works before installing it permanently.
fastboot flash recovery twrp.img writes TWRP to the recovery partition. Use it only when your device actually has a recovery partition and the device-specific guide says to use this method.
fastboot flash boot twrp.img writes TWRP to the boot partition. This can break the device if used incorrectly. Use it only when the device-specific guide clearly says to flash the boot partition.
Method A: Flash TWRP to the Recovery Partition
Use this method only if your device has a separate recovery partition and the device-specific guide says to flash recovery.
Run:
fastboot flash recovery twrp.imgAfter flashing, do not boot directly into Android. Some stock ROMs can replace custom recovery on first boot.
Instead, boot directly into recovery using the hardware key combination for your device.
Method B: Temporarily Boot TWRP
Many newer devices require temporarily booting TWRP first.
Run:
fastboot boot twrp.imgThe phone should boot into TWRP without permanently flashing it.
From inside TWRP, follow the device-specific instructions. Some devices need a TWRP installer ZIP. Some devices require installing recovery ramdisk from the TWRP Advanced menu. Some devices should not have TWRP permanently installed at all.
Method C: Flash TWRP to the Boot Partition
Use this only if your device-specific instructions clearly say to flash TWRP to the boot partition.
Run:
fastboot flash boot twrp.imgThis method is not universal. Flashing the wrong boot image can stop Android from booting.
Method D: Flash TWRP to Recovery Ramdisk
Some Huawei or Honor devices use a recovery ramdisk partition.
Use this only if your device guide specifically says to flash recovery_ramdisk.
Run:
fastboot flash recovery_ramdisk twrp.imgDo not use this command on other devices.
Step 8: Boot Directly Into TWRP
After flashing or temporarily booting TWRP, boot directly into TWRP Recovery.
If you used:
fastboot boot twrp.imgthe device should boot into TWRP automatically.
If you flashed a partition, use the correct Power and Volume key combination for your device to enter recovery. The exact keys vary by brand and model.
Do not boot into Android first unless your device-specific guide tells you to. Some stock ROMs may restore stock recovery during the first boot.
Step 9: Decide Whether to Allow System Modifications
When TWRP opens for the first time, it may ask whether to keep the system read-only or allow modifications.
For beginners:
- Keep read-only if you only want to inspect the device or temporarily use TWRP.
- Allow modifications only if you are installing a ROM, root package, or TWRP permanently and understand the risk.
Allowing modifications can affect OTA updates, verified boot, encryption, and the ability to boot stock Android.
Step 10: Verify That TWRP Works
Before flashing anything else, check:
- Touchscreen works
- Internal storage is visible
- MTP works, if needed
- ADB works from recovery, if needed
- The device can reboot back into recovery
- TWRP matches your device codename
If storage shows 0 MB or TWRP asks for a password, do not wipe anything blindly. Read the troubleshooting section first.
Step 11: Take a Backup Before Flashing Anything
If your TWRP build supports backups properly, take a backup before installing a ROM, kernel, Magisk, GApps, or any other ZIP.
At minimum, back up your personal files outside the phone. A TWRP backup may not fully protect encrypted storage or dynamic-partition devices.
Troubleshooting TWRP Installation Problems
adb devices does not show the phone
Try these fixes:
- Unlock the phone screen.
- Accept the USB debugging prompt.
- Use another USB cable.
- Use another USB port.
- Reinstall device drivers on Windows.
- Run
adb kill-server, thenadb devicesagain.
fastboot devices does not show the phone
ADB and Fastboot are different modes. A phone can work in ADB but fail in Fastboot if the driver is missing.
Try:
- Reinstalling the Fastboot/USB driver
- Using another cable
- Using another USB port
- Checking that the phone is actually in Fastboot mode
- Using the latest Platform-Tools
FAILED (remote: No such partition)
This usually means the partition you are trying to flash does not exist on your device.
For example, many A/B devices do not have a separate recovery partition. If fastboot flash recovery twrp.img returns No such partition, stop and check the device-specific TWRP instructions.
Do not keep trying random partition names.
FAILED (remote: Flashing is not allowed)
This usually means the bootloader is locked, or the device does not allow flashing that partition.
Unlocking the bootloader may wipe the device. Follow the official bootloader unlock method for your device.
Too many links or USB-related Fastboot errors
This is usually a USB communication problem.
Try:
- A different USB cable
- A direct motherboard USB port instead of a hub
- A USB 2.0 port if available
- Restarting the computer
- Rebooting the phone back into Fastboot mode
- Updating Platform-Tools
Phone is stuck in Fastboot mode
Do not flash more files randomly.
First try rebooting:
fastboot rebootIf the phone returns to Fastboot again, you may need the correct stock boot or recovery image for your exact model and firmware. Do not flash a stock image from a different model, region, or Android version.
TWRP shows 0 MB internal storage
This usually happens when TWRP cannot decrypt the data partition. It may be caused by encryption, Android version mismatch, or an unsupported TWRP build.
Do not format data unless you understand that it will erase internal storage.
Check the maintainer notes for your device and firmware version.
TWRP asks for a password
TWRP may be trying to decrypt the data partition.
Try your lock-screen PIN or password. If it does not work, the TWRP build may not support your current encryption method.
Do not wipe data unless you have a backup and understand the result.
Phone boots back to stock recovery
Some stock ROMs restore stock recovery after booting into Android.
After flashing TWRP, boot directly into recovery before booting Android. If your device requires a TWRP installer ZIP or recovery ramdisk install step, complete that step from inside TWRP.
OTA updates fail after installing TWRP
This can happen. Installing TWRP, root, or modifying partitions may break official OTA updates.
You may need to restore stock boot/recovery images before taking OTA updates. Follow your device-specific update instructions.
How to Recover If TWRP Does Not Boot
If the phone still boots into Android, stop flashing and recheck the TWRP instructions for your exact device.
If the phone is stuck in Fastboot mode, you may need to restore the correct stock boot or recovery image for the same model, region, and firmware version.
If you used:
fastboot boot twrp.imgthen TWRP was only booted temporarily. Rebooting usually returns the phone to its previous boot/recovery state.
If you flashed the wrong partition, restore the correct stock image before continuing. Do not flash firmware files from another device.
Frequently Asked Questions
Can I install TWRP on any Android phone?
No. TWRP is available for many Android devices, but not all phones have a working TWRP build.
Does installing TWRP wipe data?
Installing TWRP itself may not always wipe data, but unlocking the bootloader usually wipes the device. Mistakes during flashing can also cause data loss.
Is Fastboot the same as ADB?
No. ADB works while Android is booted or while recovery supports ADB. Fastboot works from Bootloader/Fastboot mode and is used for low-level flashing commands.
Should I use fastboot flash recovery or fastboot boot?
It depends on your device. Older devices with a recovery partition may use fastboot flash recovery. Many newer A/B devices use fastboot boot first, then install TWRP from inside recovery.
Can I use another device’s TWRP image?
No. Flashing another device’s TWRP image can brick your phone.
Why did fastboot flash recovery twrp.img fail?
Your device may not have a separate recovery partition, the bootloader may be locked, or you may be using the wrong Fastboot method for the device.
Where should I ask for help?
You can use the CyanogenMods forum topic for installing TWRP with Fastboot.
When asking for help, include:
- Device name
- Model number
- Codename
- Android version
- TWRP file name
- Exact command used
- Full error message
Related CyanogenMods Pages
- Find the correct TWRP image for your Android phone
- Motorola TWRP recovery downloads
- Samsung TWRP recovery downloads
- TWRP Fastboot installation support topic
Final Advice
The safest way to install TWRP is not to memorize one Fastboot command. The safest way is to identify your exact device, download the correct TWRP image, read the device-specific install notes, and then choose the correct command.
For many older devices, that command may be:
fastboot flash recovery twrp.imgFor many newer devices, the safer first step may be:
fastboot boot twrp.imgDo not guess. If the command does not match your device’s install notes, stop and verify before flashing.

 Vivo Y21 GCam port
 Vivo Y20 GCam port
 Realme 7 GCam port
 GCam APK port
 Poco M3 GCam Port
 Oppo GCam port
 Vivo GCam port
 Redmi Note 9 Pro GCam port