GCam Port | Google Camera APK v9.2 (April 2024) › Forums › Xiaomi Device Forums › Mi 8 – dipper › [TWRP / ROOT] How to Install TWRP and ROOT Xiaomi Mi 8
Tagged: Kyaw Zay Ya, ROOT, TWRP
- This topic has 7 replies, 3 voices, and was last updated 5 years, 8 months ago by Linux User.
- AuthorPosts
- June 15, 2018 at 3:41 PM #38796Linux UserParticipant
TWRP for Mi 8 (dipper) is now available from an unofficial build and this post guides you how to install TWRP for Mi 8 and ROOT Mi 8 (using TWRP recovery).
This TWRP download for Mi 8 is brought to you by developer(s) Kyaw Zay Ya
If you want to donate him then follow the below link:
– Donate to Kyaw Zay Ya via PayPalDISCLAIMER:
THIS IS AN INITIAL UNOFFICIALLY BUILD TWRP FOR Mi 8. FLASH AT YOUR OWN RISK.
INSTALLING THE TWRP FOR Mi 8 NEEDS AN UNLOCK BOOTLOADER ON YOUR PHONE.
DURING THE BOOTLOADER UNLOCK PROCESS ALL THE PHONE DATA WILL BE ERASED.
ROOTING Mi 8 MAY BRICK THE PHONE.
MAKE SURE YOU READ THE ADVANTAGES AND DISADVANTAGES OF ROOTING BEFORE YOU PROCEED FURTHER.
Before proceeding further you may consider backup all data on the phone.
You are the only person making changes to your phone and I cannot be held responsible for the mistakes done by you.Content structure:
DOWNLOAD LINK OF TWRP FOR Mi 8, OTHER DOWNLOADS AND REQUIRED GUIDES:
- Mi 8 Phone, USB cable and a Windows PC.
- Ulocked bootloader on the Mi 8
- ADB and Fastboot utility. below are the download links and guides to install:
– 15 Seconds ADB Installer for Windows
– Minimal ADB and Fastboot for Windows
– How to install ADB and fastboot on Linux
– How to install ADB and fastboot on MAC - USB drivers
- TWRP installer | TWRP Download 1 | AFH Mirror Link for Mi 8
STEP BY STEP GUIDE OF HOW TO INSTALL TWRP FOR Mi 8:
- Download and extract the Mi 8 TWRP rar compressed file.
You get the following contents in that package:
– ADB, Fastboot binary and required dll files
– mi8-twrp一键刷入工具.bat file that will take you to a user menu and which will also help you flashing the Mi 8 TWRP
– recovery-TWRP-3.2.1-0611-XIAOMI8-CN-wzsx150.img [THIS IS THE TWRP RECOVERY IMAGE]
– 打开CMD命令行可重启到recovery模式.bat file that prints executable ADB and fastboot commands - Connect the Mi 8 to the PC using the USB cable and install required USB driver
- Install 15 Seconds ADB Installer or Minimal ADB and Fastboot for Windows or Linux or MAC as per the PC you have
- Unlock bootloaader on Mi 8
- Once you have unlocked the bootloader, connect the phone once again to you PC.
- You can flash the Mi 8 TWRP automatically or Manually as explained in below steps:
- Then, on your PC, go to the directory where you have extracted the TWRP for Mi 8
- Double click on the mi8-twrp一键刷入工具.bat file, which will open a command window. Press any key to continue.
- Then you see three options as following:
–> 1. The Boot State
–> 2. Fastboot Mode
–> 3. Other StatePress 1 if you the Mi 8 is in power on state.
Press 2 if the phone is in fastboot mode
Press 3 if the phone is in other state (may be in recovery mode) - When asked press any key to continue. The TWRP will be flashed automatically on your Mi 8.
Once the TWRP is flashed, the phone will be rebooted automatically. - Then, on your PC, go to the directory where you have extracted the TWRP recovery for Moto G6 Plus and then open the command console or terminal on this directory on your PC.
– To open a command window on Windows OS in the current directory, press shift + Right Click anywhere on Windows explorer, or some folder. Then on the menu opened, just press the “w” key on the keyboard or select “Open command window here” to open a command window.
- Enter the following command on the opened command window:
adb reboot bootloader
to put your phone into bootloader mode where you can flash/install TWRP for Mi 8.
If your phone asks for permission; such as “Allow USB debugging” then just tap on OK to proceed. - Now when your phone is on the bootloader mode just execute the following command on the console:
fastboot flash recovery recovery-TWRP-3.2.1-0611-XIAOMI8-CN-wzsx150.img
fastboot flash misc misc.bin
- Wait for the fastboot command to install TWRP for Mi 8 phone.
Once it is done, execute the below command:fastboot reboot recovery
on the command console to start the phone in TWRP recovery mode.
FLASH Mi 8 TWRP IN AUTO MODE:
MANUALLY FLASH THE TWRP FOR Mi 8:That’s all. You should have the TWRP installed on your Mi 8. You may now want to ROOT Mi 8 or may want to install some custom ROM or want to explore what else can you do with this TWRP? Head over to the following section to know more.
What to do after you install TWRP for Mi 8:
- You can root the Mi 8
- You can install one of the custom ROMs available for Mi 8
- You can install some of the mods available on Mi 8
Well, this isn’t it. You can install customized themes, sound mods, Xposed modules etc. after installing the TWRP for Mi 8.
TWRP recovery is the gateway to many goodies for your phone.Now, if you want to ROOT Mi 8 then below is a step-by-step by guide for the same.
REQUIRED DOWNLOADS OR GUIDES FOR Mi 8 ROOTING:
- Make sure you have already unlocked the bootloader and installed TWRP for Mi 8
– Well, this is a very important aspect of this SuperSU ROOT process. The SuperSU zip file is developed in a way to be installed via a TWRP recovery or other custom recovery. Stock recovery may not be able install this SuperSU or Magisk ROOT zip file.
- Download the latest SuprSU ROOT for Mi 8 or one of the following:
- Download link for Latest SuperSU zip file
- Download link for STABLE SuperSU zip file
- Download link for SuperSU BETA zip file
- Download link to SuperSU APK Free version
- Download link to SuperSU APK Pro version
- Download link to Magisk ROOT zip file
IMPORTANT NOTE:- Your phone will not be rooted just by installing the SuperSU APK file on your Android phone.
- SuperSU APK Free or Pro version is just a SuperSU ROOT management application.
- The SuperSU APK Free or Pro app will ONLY work if you have already ROOTED your Android Phone.
Step-by-Step guide on how to ROOT Mi 8 using SuperSU or Magisk zip file:
- Download and copy the SuperSU or Magisk ROOT zip file to Mi 8. (I hope you have already downloaded the SuperSU zip file from the above downloads section)
- Now restart the Mi 8 to boot into TWRP recovery.
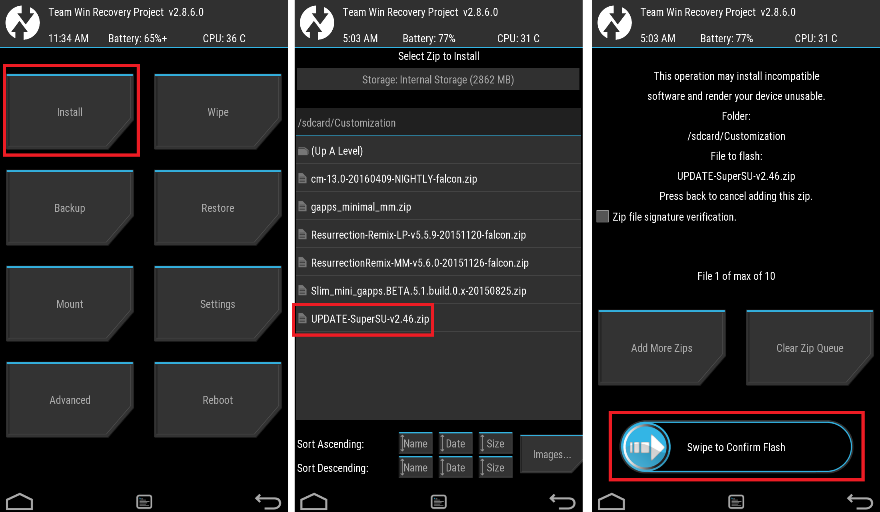
- Then, Select the Install from TWRP home screen, then select the SuperSU ROOT zip file from the file browser.
- Flash or install the SuperSU or Magisk zip file for Mi 8, by Sliding the Swipe to Confirm Flash on TWRP screen.
- Wait for TWRP to flash the SuperSU or the Magisk. Once the flashing is done just reboot your device.
- Profit!!! You should now have ROOT on Mi 8.
How to check if ROOT is enabled on Mi 8 or NOT?
Install the ROOT checker app from the Play Store and verify if your phone is ROOTED or not.
Here is a screenshot how to flash the SU ROOT binary via TWRP:

If you face any problems on this guide to install TWRP for Mi 8 then, you can login and reply here. Either me or some other user on this forum will revert back to your query as soon as possible.
Stay tuned or Subscribe to the Mi 8 (dipper) forum For other Android Custom ROMs, Lineage OS ROMs, and all other device specific topics.August 8, 2018 at 4:14 AM #42876Linux UserParticipantHi, I tried to root my Mi8 using TWRP-3.2.2-0711 and Magisk-v16.4 but it keeps booting into TWRP. Is there something I can do? I’m worried. Thanks
August 9, 2018 at 9:05 PM #43169Linux UserParticipantCan you flash the following zip using TWRP: https://androidfilehost.com/?fid=817906626617949632
and see if it boots.If it does not boot, then try removing the magisk patch..
To remove magisk installation, flash the magisk 16.4 uninstaller: https://github.com/topjohnwu/Magisk/releases/download/v16.4/Magisk-uninstaller-20180627.zip
and see if it boots or notIf it does not boot even after removing magisk, please attach a screenshot so that I can guide you what to do next.
I am tracking this topic on priority to help you out.
Make sure you take backup before modifying anything on your phone.August 9, 2018 at 10:17 PM #43176Linux UserParticipantHi!
I had the same problem with Magisk and removing the Magisk patch helped.
Trying SuperSU now, hopefully that works.Thank you very much for the guide!
August 9, 2018 at 11:17 PM #43183Linux UserParticipantHi
I tried flashing miui 9 global with twrp and it didn’t work. Flashing it with MiFlash however did work, and the phone seems to be fine, connectivity and everything. I really need to take backups though, I’m new to this thing.SuperSU didn’t work when I tried, twrp gave me an error and then it booted my unrooted miui. So I’ll continue trying with magisk. Seems like you need to do something else to the phone before applying magisk as far as I’ve read, but I didn’t really understand.
August 10, 2018 at 8:36 AM #43188Linux UserParticipant@diego_gonzalez_vizoso
Just have a backup of the current software and also, have a stock firmware image of Mi 8 just in case you need to flash back to get the device back, if something goes wrong.I will search a bit around to see how we can get the root done on Mi 8 by flashing Magisk.
August 10, 2018 at 9:07 AM #43198Linux UserParticipantThere’s a guide (but it’s not in english so I’m not linking it) that says that for magisk “DM verity disabler” needs to be installed. As I said, I don’t know why I have to do that nor if that’s enough.
Thanks for the help!
August 10, 2018 at 12:11 PM #43206Linux UserParticipant[quote quote=43169]Can you flash the following zip using TWRP: https://androidfilehost.com/?fid=817906626617949632
and see if it boots.[/quote]
This was the link to the DM verity disabler which I added earlier.
According to the following Android security page:
https://source.android.com/security/verifiedboot/#backgroundSince 4.4, the KitKat version, Android has the Verified boot and the DM-verity kernel feature.
Following are some of the key points to be noted about dm-verity and the Verified Boot feature:- On Android version below 7.0 and greater than 4.4, where users were warned about device corruption (if the system or boot partition is modified), but still allowed them to boot their devices.
- Android 7.0 started strictly enforcing Verified Boot to prevent compromised devices from booting.
[su_note note_color=”#D7E3F4″ text_color=”#728095″ radius=”3″ class=”” id=””]So what happens when you install the Magisk?
– It modifies the system partition to include some scripts, su binary (the ROOT binary file) etc.
– While booting the signature of the system image (which is now modified) is calculated and then verified with the earlier stock signature, which will not match now.
– The above verification is done by DM-verity security feature of Android.
– If you disable this, it won’t check the system integrity and will allow you to boot even if it has been changed.[/su_note]I hope I was able to explain it correctly. :)
You give it a try and see if you are able to ROOT successfully.
First flash the DM-verity disable zip and then flash the Magisk zip file. - AuthorPosts
- You must be logged in to reply to this topic.


