GCam Port | Google Camera APK v9.2 (April 2024) › Forums › Forum for Common Topics (Generic Topics for all Devices) › TWRP – Team Win Recovery Guides › How to Clean/Wipe Data using TWRP on any Android Phone
- This topic has 11 replies, 7 voices, and was last updated 4 years ago by Siba.
- AuthorPosts
- April 2, 2020 at 5:01 AM #110168SibaKeymaster
[postquote quote=106820][/postquote]
When you are installing Android 10 on a previously installed Android Pie you need to clean the data partition, system partition and the cache partition.
Cleaning of all the above partition(s) is known as clean flash. This is must if you are flashing a new Android verison on top of the older one.April 24, 2024 at 3:34 PM #3192Linux UserParticipantIf you are looking to Wipe data or partitions using TWRP recovery on your Android phone or tablet then yes you are at the right place. Here I will present you a step-by-step guide with screenshots. You just need to learn the process once and the next time you will do that I can bet that you will have already mastered on it or probably you will teach me the next time.
I am sure that if you have reached here that means you really want to learn how to wipe data or cache or any partitions on your Android phone using TWRP recovery. For a couple of minutes just be with me to understand what exactly happening around. I can also bet you that if you will go through the guide carefully then you will probably never endup with a bricked device or buggy custom ROMs because as part of this guide you will also learn how to backup before cleaning data.
Why do you need to Clean/Wipe Partitions on your Android phone:
You will be interested in this question if you are a beginner else I am sure you won’t waste your time knowing why do someone want to clean data and you are free to move on to further sections. If you are still interested then carry on reading what comes!
Answering the question… Well, there could be many situations where you really need to wipe data out because you just want to reset your phone to the factory mode, that’s it. You can do this with the stock recovery that had come with your Android phone or tablet, you don’t need to have a TWRP recovery for that, isn’t it!
If you see closely, the title says that how to wipe data using a TWRP recovery. So, if you have come to this post then I assume that you have already installed a TWRP recovery on your phone or tablet and you just want to wipe data/partitions because you want to install a Custom ROM on your beautiful Android device. That’s what exactly most people use the wipe functionality of a custom recovery.
How many partitions are there to Clean/Wipe:
Basically Android has a partition layout of the whole system. Won’t explain much in detail but there are boot partition, System Partition, Data Partition, Cache partition and prior to Android Lollipop there was Dalvik Cache. I really don’t why the latest TWRPs still have an option to wipe Dalvik Cache !!!
DISCLAIMER:
Before proceeding further you may consider backup your all data. You are the only person doing changes to your phone and I cannot be held responsible for the mistakes done by you. Neither the developer nor we will be held responsible for any disaster that happens to your device.How to wipe data/partitions using a TWRP recovery:
Make sure that you already have a backup of your useful data. If you have not yet done this then move on to the next link and come back:
How to Take NANDROID Backup on TWRP Recovery- Go ahead and reboot your device to recovery mode. So, now you must be on the TWRP home screen.
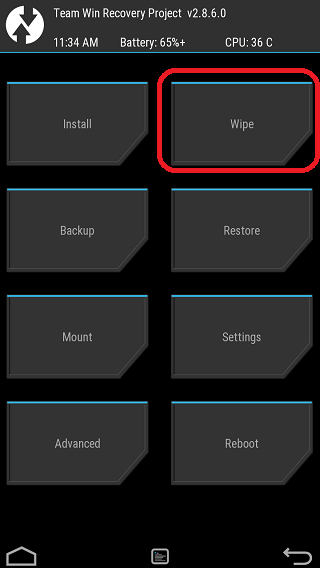
Now, on the TWRP home screen click on the Wipe touch button.Below is a screenshot of the TWRP home screen marked on the Wipe button which you have to select.

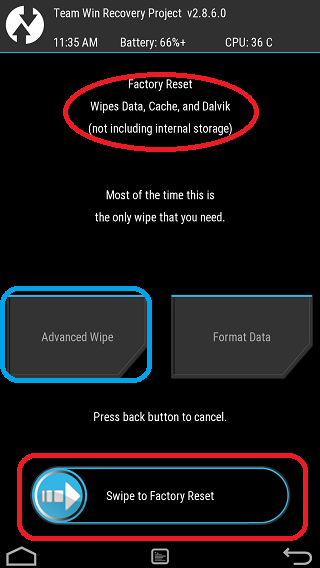
- Now on the Wipe screen, if you just want to do a Factory Reset then Swipe the button at the bottom of the screen to do a Factory Reset. The Factory Reset will clean Data partition, Cache partition and the Dalvik cache partition.
Here you need to be careful and should have a backup of your precious data because it will clean all your phone data.
CAUTION:
Sometimes just the Factore Reset will also clean all the internal phone storage where as in TWRP it has mentioned that it does not clean the internal phone storage. At least it is happening on my Moto G where I don’t have a separate SD card option and all the data partition and the internal partition data goes to one storage area. So, here you must be cautious and should have a backup before cleaning anything.In phones where there is a provision to have a separate micro SD card it may not clean the micro SD when you do a factory reset.
Below is a screenshot of the TWRP Wipe screen:
- If you are mentally prepared that the Factory Reset option will not help for you or you want to clean everything on your phone then go to Advanced Wipe option and then select the partitions you want to wipe.
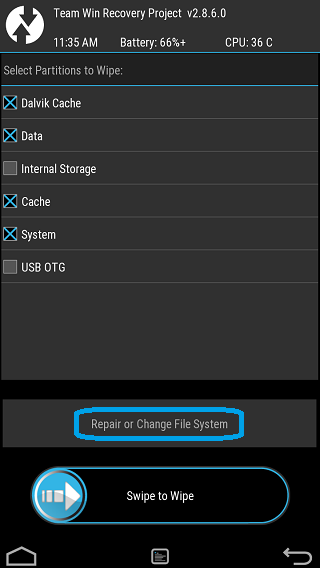
Select the Dalvik Cache, Data, Internal Storage, Cache, System partition to clean. For me there is no need to clean Internal Storage and hence I had left that option but if you want to clean your microSD then you should consider selecting this field. After that wipe the touch button at the bottom of the screen from left to right to wipe the selected partitions.
Below is an image depicts how the Advanced Wipe screen looks like and what exactly you have to do:
For some devices it is required to convert the filesystem before you wipe. So, I have highlighted the change filesystem button in blue. It is not always needed but in case you need this, here you have to execute.
That’s all folks. After executing all of the steps explained above, you will have a clean Android device on your hand. If you have any concerns while wiping on TWRP then feel free to reply to this thread.
- Go ahead and reboot your device to recovery mode. So, now you must be on the TWRP home screen.
- AuthorPosts
- You must be logged in to reply to this topic.
5 thoughts on “How to Clean/Wipe Data using TWRP on any Android Phone”